
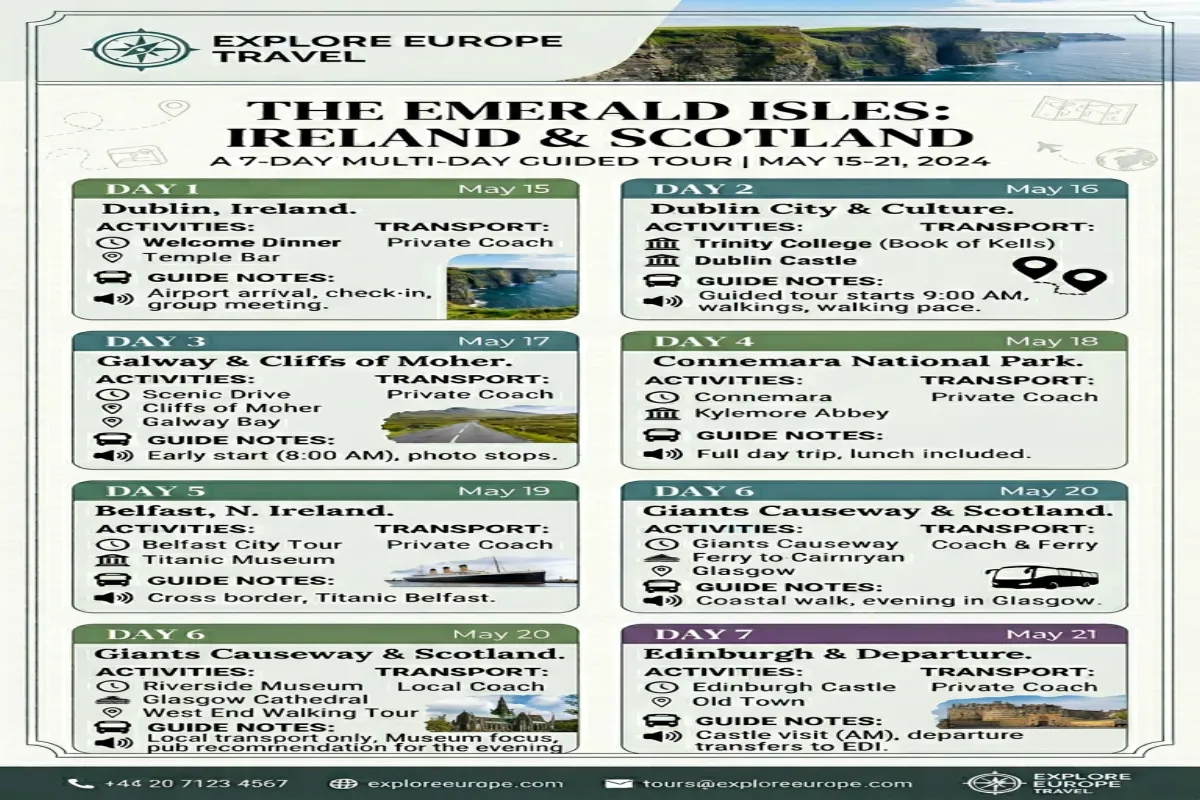
A tour itinerary is different from a personal travel itinerary. It’s not just about where you’re going — it’s about moving a group of people through a sequence of locations with specific timing, logistics, and often a narrative thread connecting the stops. Whether you’re a tour operator building a client-facing schedule, a travel agent packaging a multi-day tour, or a traveler organizing a self-guided walking tour of a city, the itinerary needs to communicate more than just times and places.
This free tour itinerary template gives you a structured format for any type of tour — from a 3-hour city walking tour to a 14-day multi-country guided trip. It covers the day-by-day schedule, stop details, logistics, guest information, and the operational details that keep a tour running smoothly.
What’s in This Template
1. Tour Overview
The summary page: tour name, tour type (walking tour, bus tour, multi-day guided trip, self-guided itinerary), start and end dates, start and end locations, total duration, group size, difficulty level, and what’s included (meals, entrance fees, transportation, accommodation). For tour operators, this page doubles as the marketing summary — the quick-reference sheet guests receive before booking or upon confirmation.
2. Day-by-Day Tour Schedule
Each day has a detailed timeline: departure time, transportation to first stop, arrival time, stop name, stop duration, description of what happens at each stop (guided explanation, free exploration time, activity), departure from stop, transit to next stop, meal breaks with restaurant name and location, and return time. Each stop includes a “tour guide notes” field — context, talking points, or historical facts that elevate the visit from “we went there” to “we understood why it mattered.”
3. Stop Details
Expanded information for each tour stop: location name, full address, GPS coordinates (essential for bus drivers and self-guided visitors), opening hours, entrance fee, ticket pre-purchase requirements, accessibility notes, photography rules, recommended visit duration, and nearby facilities (restrooms, ATMs, cafés). For tour operators, this section becomes the operational reference — the information your guide needs to manage the stop smoothly.
4. Transportation and Logistics
Every movement between stops: mode of transport (bus, walking, boat, train), distance, estimated travel time, pickup and drop-off points, driver or company name, vehicle details, and backup transportation plan. For multi-day tours, includes inter-city transfers with luggage handling instructions. For walking tours, includes route notes — which streets, which direction, where to cross, and landmarks to watch for so guests don’t get separated.
5. Accommodation Schedule
For multi-day tours: hotel name and address for each night, check-in and check-out times, room allocation (for operators managing group bookings), meal plan at each hotel (breakfast included, half-board, full-board), and proximity to that evening’s dinner location or the next morning’s departure point. Room list section for operators assigning rooms to guests.
6. Meal Plan
Every meal during the tour: type (breakfast, lunch, dinner, snack stop), included or at own expense, restaurant name and location, cuisine description, dietary accommodations available, reservation confirmation, and estimated cost for non-included meals. For tours that include meals, this section tells guests exactly what to expect. For tours with free meals, it provides curated recommendations so guests aren’t wandering hungry in an unfamiliar city.
7. Guest Information Sheet
For tour operators: guest roster with names, contact numbers, dietary restrictions, medical conditions the guide should know about, emergency contacts, passport numbers (for international tours), and room assignments. For self-guided tours, this becomes your personal travel info page — the same details a tour company would collect, organized for your own reference.
8. Packing Recommendations
Tour-specific packing guidance: what to wear for walking tours (comfortable shoes, layers), what to bring for outdoor activities (sunscreen, water bottle, hat), items the tour provides vs. what guests need, and anything prohibited at certain stops (backpacks at museums, flash photography at churches). This section manages expectations — guests who show up in heels for a cobblestone walking tour had fair warning.
Plan Your Trip Today!
Get a complete, personalized trip template in seconds.
Take full control to customize every detail. Or, skip the template and build your itinerary with AI
Plan My TripHow to Use It
- Define your tour type. A 3-hour walking tour and a 10-day guided trip use the same template differently. For short tours, the Day-by-Day Schedule is one section with tight time blocks. For multi-day tours, each day gets a full page. Adjust the template depth to match your tour length.
- Build the schedule around stop durations, not departure times. Most tour schedules fail because they underestimate how long stops actually take. Start with realistic stop durations (including time for photos, questions, restroom breaks, and regrouping), then add transit times between stops, then see what time the day ends. Adjust the number of stops rather than compressing time at each one.
- Include buffer time between stops. Add 10-15 minutes of buffer after every two stops. Tour groups always take longer than planned — someone needs the restroom, someone wants another photo, someone asks a question that turns into a conversation. Without buffer, the entire afternoon slides late.
- Write guest-facing and guide-facing versions. Guests get a clean schedule with times, locations, and descriptions. Guides get the same schedule plus operational notes: driver’s phone number, backup restaurant if the first is closed, where to park the bus, which entrance to use at the museum. Use this template for the detailed version and create a simplified one-page summary for guests.
- Test the route before the tour. For walking tours, walk the route yourself and time each segment. For driving tours, drive the route and note parking situations. Armchair itinerary planning always underestimates real-world logistics. A test run catches problems that Google Maps can’t predict.
- Export and share. Use the Yopki Travel Document Organizer to merge the tour itinerary with venue tickets, maps, and booking confirmations into one tour packet for each guest.
Tour Planning Tips
Front-load the best stops. Guest energy and attention peak in the morning. Schedule the most impressive or important stop first. By late afternoon, attention fades — schedule lighter stops, free time, or scenic rest stops for the end of the day. For a deeper dive, check out our complete trip planning guide
Plan meals around location, not just time. Don’t schedule lunch at noon if the group will be at a location with no restaurants until 1 PM. Plan meals based on where the group will physically be, then adjust timing to fit. A meal in the right location at an odd time beats a meal at the “right” time in a bad location.
Always have a rain plan. For every outdoor stop, note an indoor alternative. “If rain: visit the covered market instead of the hilltop viewpoint” takes 10 seconds to plan and saves an hour of standing in the rain trying to improvise.
Related Templates
- This Tour Itinerary — structured schedule for guided or self-guided tours. Best for tour operators, travel agents, and travelers building curated tour experiences.
- Road Trip Itinerary — route-based travel with driving segments and stops. Best for self-drive tours and road trip routes.
- Cruise Itinerary — port-by-port schedule with shore excursion planning. Best for cruise tours.
- Free Itinerary Template — browse all template formats and trip types.
FAQ
How do you write a tour itinerary?
Start with your stops and their realistic visit durations. Add transit times between each stop. Build in meal breaks based on location. Add 10-15 minutes of buffer after every two stops. Include all logistical details — addresses, opening hours, ticket requirements, and transportation. Write stop descriptions that explain why each place matters, not just what it is. Test the route in person if possible.
What should a tour itinerary include?
A complete tour itinerary includes: tour overview (dates, type, what’s included), day-by-day schedule with timed stops, stop details (address, hours, fees, duration), transportation logistics between stops, meal plan, accommodation for multi-day tours, guest information, and packing recommendations. For operators, add guide notes and operational details.
How do you plan a self-guided tour?
Research stops in the order you’ll visit them. Map the route to minimize backtracking. Check opening hours and days — many museums close on Mondays. Estimate walking or driving time between stops using Google Maps. Build the schedule with more buffer time than a guided tour since you won’t have a guide keeping things on track. Download offline maps and save addresses in advance.
What is the difference between an itinerary and a tour program?
An itinerary is the day-by-day schedule of activities, times, and locations. A tour program is broader — it includes the itinerary plus marketing description, pricing, inclusions and exclusions, terms and conditions, and booking information. This template covers the itinerary portion. Tour operators typically embed this itinerary within their larger tour program document.