
Travel planning apps come and go. Spreadsheets are forever.
If you’re the kind of traveler who wants to see your entire trip on one screen — flights, hotels, daily plans, budget, and packing list — a spreadsheet is still the most flexible tool available. No subscription fees, no feature limits, and you can share it with your entire travel group with one link.
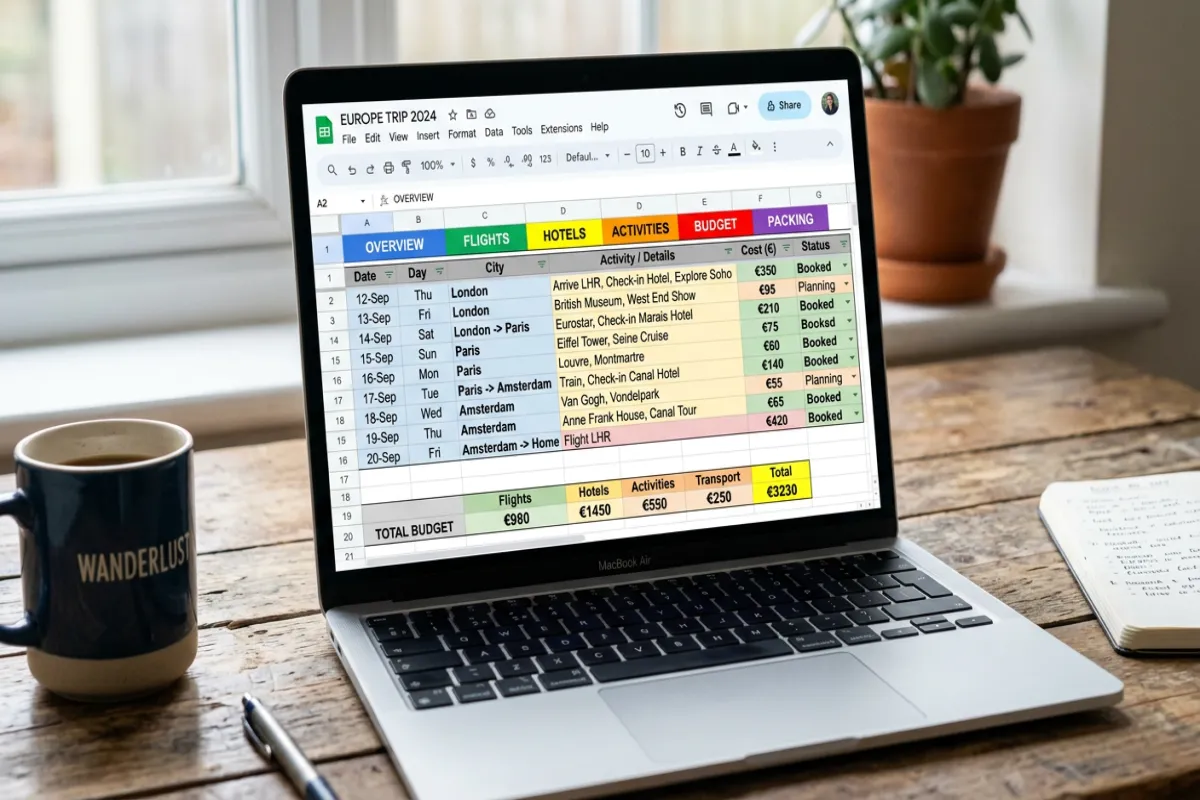
Below is a free trip planning spreadsheet template for Google Sheets. Copy it to your Drive and start planning. Or, skip the template and build your itinerary with AI
What’s Included in This Template
The spreadsheet has six tabs, each designed for a different part of trip planning: You can also browse all itinerary templates to find the right format
1. Trip Overview
Your at-a-glance dashboard. Enter your destination, travel dates, time zone, currency, and emergency contacts. This is the tab you’ll reference most during your trip — think of it as the cover page of your travel packet.
2. Day-by-Day Itinerary
The core of your plan. Each row is a time block with columns for date, time, activity, location, confirmation number, cost, and notes. Pre-formatted with conditional formatting that highlights today’s date so you always know where you are in the schedule.
3. Flights & Transportation
Track every leg of your journey: airline, flight number, departure/arrival times, terminal, gate, confirmation number, and seat assignment. Works equally well for trains, buses, ferries, and rental cars.
4. Accommodation
Hotel name, address, check-in/check-out times, confirmation number, contact phone, Wi-Fi password (yes, you’ll want this), and nightly rate. If you’re splitting time between multiple hotels or Airbnbs, each gets its own row.
5. Budget Tracker
Set your total budget at the top. Every expense gets logged with a date, category (flights, hotels, food, activities, shopping), amount, and payment method. Running totals and a remaining budget formula update automatically so you always know where you stand.
6. Packing Checklist
Categorized packing list with checkboxes. Categories include documents, electronics, clothing, toiletries, and trip-specific gear. Check items off as you pack — a progress bar at the top shows your completion percentage.
How to Use This Template
- Make a copy. Click the link below to open the template in Google Sheets. Then go to File → Make a copy to save it to your own Google Drive. The original template stays untouched.
- Fill in the Trip Overview tab first. Dates, destination, and currency set the foundation for the other tabs.
- Build your itinerary day by day. Don’t try to plan every hour on day one. Start with the fixed items (flights, hotel check-ins, pre-booked tours) and fill in free time later.
- Share with your travel group. Click Share in the top right and add your travel companions. Everyone can edit the same sheet in real time — no more “did you get my updated itinerary?” emails.
- Export as PDF before your trip. Go to File → Download → PDF to create a printable version. Or use the Yopki Travel Document Organizer to merge this PDF with your booking confirmations, insurance docs, and passport copies into one complete travel packet.
Plan Your Trip Today!
Get a complete, personalized trip template in seconds.
For more details, see our complete trip planning guide.
Take full control to customize every detail.
Plan My TripWhy a Spreadsheet Beats Travel Planning Apps
Total customization. Travel apps give you their structure. A spreadsheet gives you yours. Need a column for “outfit planned”? Add it. Want to track restaurant reservations separately from activities? Create a tab. The template is a starting point, not a cage.
Works offline. Google Sheets has offline mode. Enable it before your trip (Settings → Offline → toggle on) and you can view and edit your spreadsheet without Wi-Fi. Your changes sync when you reconnect.
Free forever. No premium tiers, no “upgrade to unlock PDF export,” no subscription that auto-renews after your free trial. Google Sheets is free with any Google account.
Built-in collaboration. Every travel planning app eventually discovers they need a sharing feature. Google Sheets has had real-time collaboration for over a decade. It just works.
Customization Ideas
Color-code by category. Use conditional formatting to make flights blue, hotels green, and activities orange. Makes the day-by-day itinerary scannable at a glance.
Add a currency converter column. If you’re traveling internationally, add a column with a formula like =amount * exchange_rate to see costs in your home currency alongside local prices.
Create a “pre-trip checklist” tab. Separate from packing, this covers tasks like arranging pet care, holding mail, downloading offline maps, notifying your bank, and checking visa requirements.
Link to your confirmation emails. In the “Notes” column, paste links to confirmation emails or PDF attachments in your Drive. This turns your spreadsheet into a central hub that connects to all your documentation.
When You Need More Than a Spreadsheet
A spreadsheet is excellent for planning but less ideal for the trip itself. When you’re rushing through an airport, you don’t want to scroll through a multi-tab spreadsheet to find your gate number.
That’s why we recommend exporting the key information to PDF before you travel. The Yopki Travel Document Organizer lets you combine your itinerary PDF with all your booking confirmations into one printable document — organized in the order you’ll need them during your trip.
For a Google Docs-based itinerary with a more visual layout, check out our Travel Itinerary Template for Google Docs.
FAQ
Can I use this template in Excel instead of Google Sheets?
Yes. Open the template in Google Sheets, then go to File → Download → Microsoft Excel (.xlsx). All formulas and formatting transfer cleanly. You’ll lose real-time collaboration, but the spreadsheet itself works identically.
How do I access my spreadsheet offline during my trip?
In Google Sheets, go to Settings (gear icon) → General → Offline, and toggle it on. This downloads a local copy of your recent spreadsheets. Open Google Sheets when offline and your trip planning spreadsheet will be available. Changes sync automatically when you reconnect to the internet.
Can I print this spreadsheet?
Yes. Go to File → Print or press Ctrl/Cmd + P. For the best results, set the print range to the specific tab you want (like the day-by-day itinerary) and adjust scaling to “Fit to page.” For a more polished printable version, export as PDF first.