Flying for the first time can feel intimidating. There are security lines, boarding zones, overhead bins, turbulence, and a dozen unwritten rules that everyone else seems to know already.
Here is the truth: flying is the safest way to travel, and airports are designed so that millions of people, including first-timers, navigate them every day without problems. By the end of this guide, you will know exactly what to expect at every stage, from booking your ticket to collecting your bags at the other end.
No anxiety-inducing surprises. Just the practical information you need.
Download the Free Checklist
Save it, print it, check items off as you go.
Before You Fly: Booking and Preparation
Booking Your Flight
Use Google Flights (flights.google.com) to compare prices across airlines. Enter your departure city, destination, and travel dates. The results show all available flights sorted by price, with filters for number of stops, departure time, and airline.
Key terms you will see:
- Nonstop/direct: The plane flies straight to your destination without stopping. This is the simplest option for first-time flyers.
- 1 stop / connecting flight: You land at an intermediate airport, switch planes, and continue to your destination. More on this later.
- Economy/coach: Standard seating. This is what most people book.
- Basic economy: The cheapest fare, but with restrictions. You usually cannot choose your seat, change your flight, or bring a full carry-on bag. Avoid this for your first flight if possible, since the restrictions add stress.
Choosing Your Seat
Most airlines let you choose your seat when you book or during online check-in (usually 24 hours before departure). Here is what to know:
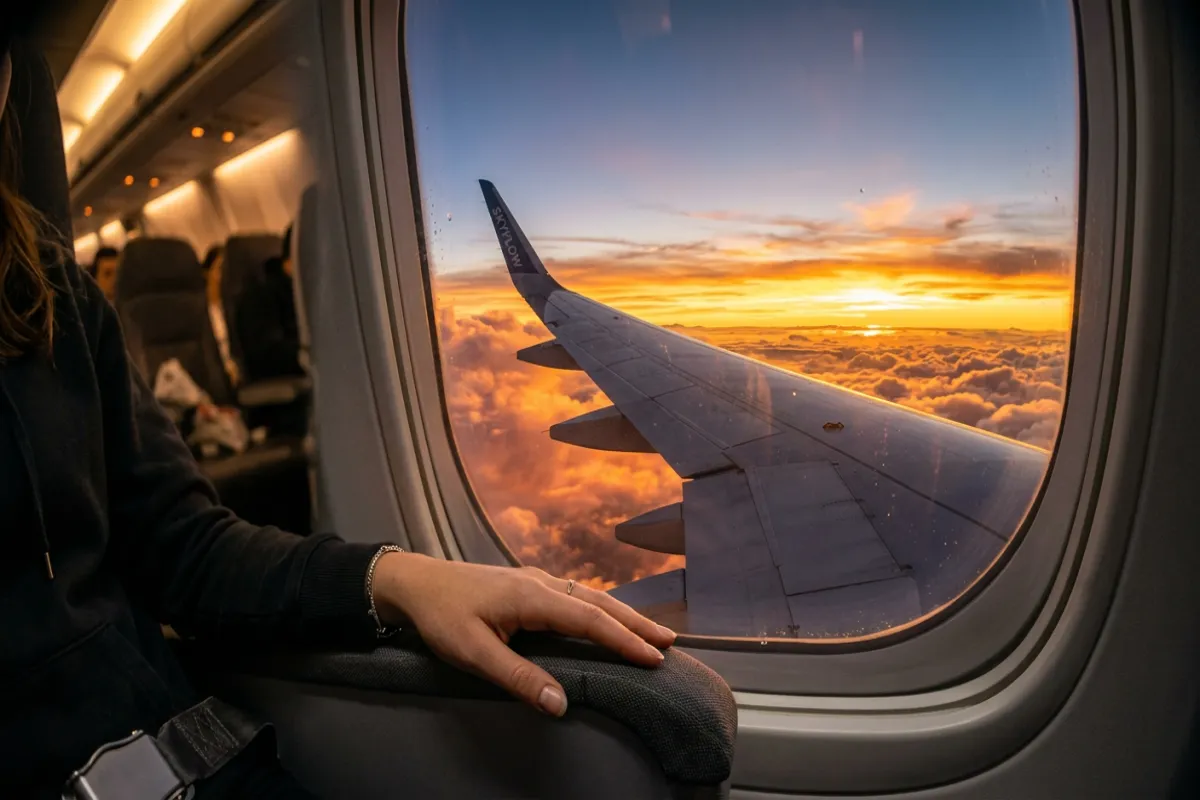
Window seat: You can look outside, lean against the wall to sleep, and nobody climbs over you. But you need to ask your seatmates to move if you need the restroom. Best for: people who want to enjoy the view or plan to sleep.
Aisle seat: Easy access to the restroom and overhead bin. You can stretch your legs into the aisle. But people will bump you as they walk past, and you will need to stand up when your seatmates need out. Best for: tall people, restless travelers, and anyone who drinks a lot of water.
Middle seat: The seat nobody wants. Less room, no view, and you are boxed in on both sides. The unwritten rule is that the middle seat gets both armrests as compensation. Avoid if you can.
For your first flight: Choose a window seat. Being able to look outside during takeoff and landing makes the experience much more enjoyable and less disorienting. You can see what the plane is doing, which reduces anxiety.
What to Pack: Carry-On vs. Checked Bag
Airlines allow two bags in the cabin: one carry-on (goes in the overhead bin above your seat) and one personal item (goes under the seat in front of you).
Carry-on bag (typically max 22 x 14 x 9 inches):
- Clothes and shoes for your trip
- Toiletries in travel-size containers (3.4 oz / 100ml or less)
- Electronics: laptop, tablet, phone charger
- Headphones
- Snacks (yes, you can bring food through security)
- A change of clothes on top in case your bag gets gate-checked
Personal item (backpack, purse, or laptop bag that fits under the seat):
- Your wallet, phone, and ID
- Boarding pass (on your phone or printed)
- Entertainment: book, downloaded shows on your phone/tablet
- Earbuds or headphones
- Gum or hard candies (for ear pressure during takeoff and landing)
- A pen (for customs forms on international flights)
- Portable battery charger
For a complete packing guide, check out our travel essentials checklist.
The Liquids Rule (3-1-1)
This is the rule that confuses the most first-time flyers. Here is how it works:
Any liquid, gel, cream, paste, or aerosol in your carry-on must be:
- 3.4 ounces (100ml) or less per container
- 1 quart-size clear plastic bag to hold all your liquid containers
- 1 bag per person
This means your toothpaste, deodorant (if it is gel or liquid), sunscreen, shampoo, and any other liquids must all fit in a single quart-size Ziploc bag, with each item in a container of 3.4 oz or less.
What does NOT count as a liquid: solid deodorant, lip balm, powder makeup, solid food, and medications in pill form. These go in your bag normally.
Pro tip: Buy travel-size toiletries at a drugstore, or buy reusable silicone travel bottles and fill them from your full-size products at home. This is cheaper than buying tiny products for every trip.
What You Cannot Bring
These items are not allowed in your carry-on:
- Sharp objects (knives, scissors with blades over 4 inches, box cutters)
- Liquids over 3.4 oz (buy water after security)
- Lighters in checked bags (one lighter is OK in your carry-on or pocket)
- Anything flammable, explosive, or corrosive
If you are unsure about a specific item, the TSA website (tsa.gov) has a searchable database where you can look up any item and see whether it is allowed in carry-on, checked bags, or neither.
What to Wear on the Plane
There is no dress code for flying, but what you wear affects your comfort level significantly.
Wear:
- Comfortable, loose-fitting clothes. Think athleisure, stretchy jeans, or soft pants.
- Layers. Planes can be freezing cold or warm depending on the section. A hoodie or light jacket solves this.
- Shoes you can slip on and off easily. You will need to remove them at security (unless you have TSA PreCheck), and your feet may swell slightly during the flight.
- Socks. Airplane floors and restrooms are not places you want bare feet.
Avoid:
- Complicated jewelry or belts with metal buckles (you will need to remove them at security)
- Boots with laces (slow to take off and put back on at security)
- Clothes that are too tight. Your body swells slightly at altitude due to cabin pressure. Tight waistbands and shoes become uncomfortable.
Getting to the Airport
How Early to Arrive
Domestic flights: Arrive 2 hours before your departure time.
International flights: Arrive 3 hours before departure.
These times feel overly cautious until you account for parking or being dropped off, walking to the terminal, check-in, security lines, and finding your gate. Security alone can take 30-60 minutes during busy periods. Having extra time means you can sit at your gate calmly instead of sprinting through the terminal.
For your first flight, err on the side of arriving early. Sitting at the gate with extra time is far better than the stress of rushing.
Getting Dropped Off vs. Parking vs. Transit
Being dropped off: The easiest option. Have someone drop you at the Departures level of your terminal. Arrivals is downstairs, Departures is upstairs at most airports.
Parking: Airport parking ranges from $10-$40 per day. Long-term lots are cheaper than short-term or garage parking. Many airports have off-site lots with free shuttle buses that save money. Apps like SpotHero can help you find and pre-book cheaper parking.
Public transit/rideshare: Many major airports have train or bus connections. Uber and Lyft both have designated pickup/dropoff zones at every major airport.
At the Airport: Check-In and Security
Check-In
Most airlines let you check in online starting 24 hours before your flight. Do this from home. It saves time at the airport and lets you choose or confirm your seat.
After checking in online, you will get a mobile boarding pass on your phone (save it to your phone wallet) or can print one at home. This is your ticket to get through security and onto the plane.
If you are checking a bag: After online check-in, go to the airline’s bag drop counter in the terminal. Show your ID, hand over your checked bag, and get a luggage tag receipt. Keep this receipt. You will need it if your bag does not show up at your destination (rare, but it happens).
If you are only carrying on: Skip the counter entirely and go straight to security.
Security Screening (TSA)
This is the part most first-timers worry about. Here is exactly what happens, step by step.
1. Join the security line. Look for signs that say “All Passengers” or “General Screening.” Have your boarding pass and government-issued photo ID (driver’s license or passport) in your hand.
2. Show your ID. A TSA agent at the front of the line checks your ID against your boarding pass. They may ask you a simple question like “Where are you headed today?” This is standard.
3. Prepare for the scanner. As you approach the conveyor belt and X-ray machine, you will need to:
- Remove your shoes and place them in a bin
- Remove your belt and any metal jewelry, and place them in a bin
- Take your laptop out of your bag and place it flat in its own bin
- Take out your quart-size bag of liquids and place it in a bin
- Remove your jacket or hoodie and place it in a bin
- Place your carry-on bag and personal item on the conveyor belt
4. Walk through the scanner. You will either walk through a metal detector (the doorframe-shaped one) or a body scanner (the round booth where you stand with your arms up). Both are completely safe. Follow the TSA agent’s instructions.
5. Collect your things. After the scan, collect your bins from the other end of the conveyor belt. Put your shoes, belt, and laptop back. You are through security.
If something triggers a flag: Do not panic. TSA agents may want to inspect an item in your bag or do a quick pat-down. This is routine and happens to experienced travelers too. It does not mean you did anything wrong. Stay calm and cooperate, and you will be through in a minute or two.
Keep your travel documents organized and accessible. Yopki’s travel document organizer lets you store boarding passes, IDs, and confirmations in one place on your phone.
Finding Your Gate and Boarding
Finding Your Gate
After security, you are in the “airside” terminal. Check the departure boards (large screens mounted on walls or hanging from ceilings) or your airline’s app for your gate number. Gates are labeled with letters and numbers (like B12 or C34).
Follow the signs. Airports are designed for navigation. Signs will point you toward gate ranges (Gates A1-A20 this way, Gates B1-B30 that way). If you are lost, ask any airport employee or fellow traveler.
Important: Gate changes are common. Your boarding pass might say Gate B12, but the departure board now says Gate B22. Always check the departure board or your airline app when you arrive at the terminal, and again about 30 minutes before boarding.
Arrive at your gate at least 30 minutes before departure time. This gives you time to use the restroom, grab water or food, and settle in before boarding starts.
Boarding the Plane
Boarding starts about 30-45 minutes before departure. The gate agent will make announcements calling passengers by group or zone. Your boarding group number is on your boarding pass.
Typical boarding order:
- Passengers needing extra assistance, families with young children, active military
- First class and business class
- Boarding groups 1-2 (premium economy, credit card holders, frequent flyers)
- Boarding groups 3-5 (everyone else, back of the plane boards first)
When your group is called, join the line with your boarding pass ready (on your phone screen or printed). The gate agent scans your boarding pass, and you walk down the jet bridge (the enclosed walkway connecting the terminal to the plane).
On the plane:
- Find your row number (labeled on the overhead bins and on seat plaques)
- Place your carry-on in the overhead bin directly above or near your seat. Wheels in first, handle facing the aisle.
- Place your personal item under the seat in front of you
- Sit down, buckle your seatbelt, and you are done
If the overhead bins near your seat are full, a flight attendant will help you find space elsewhere. Do not stress about this. It happens, especially on full flights.
During the Flight
Takeoff
Before takeoff, the flight crew gives a safety demonstration covering seatbelts, emergency exits, and oxygen masks. Pay attention, especially as a first-time flyer. It takes 3 minutes and could matter in the unlikely event of an emergency.
Your phone must be in airplane mode. The flight crew will announce when to switch it. You can still use your phone for music, games, reading, and photos, just not calls, texting, or data unless the plane has Wi-Fi (many domestic flights offer it for a fee or free, depending on the airline).
When the plane starts moving, it will taxi (drive slowly) to the runway. This can take anywhere from 5 minutes to 30 minutes depending on airport traffic. Then the pilot accelerates down the runway, and you feel the plane lift off. The takeoff roll lasts about 30-45 seconds, and the initial climb can feel steep. This is completely normal.
What you will feel: Acceleration pressing you into your seat (like a car merging onto a highway, but more sustained), a slight bump when the wheels leave the ground, and a noticeable angle as the plane climbs. Your ears might feel pressure or a slight popping sensation. Chewing gum, swallowing, or yawning helps equalize the pressure.
Turbulence: Why It Is Not Dangerous
Let us address this directly because it is the biggest anxiety for first-time flyers.
Turbulence is the plane moving through uneven air. Think of it like a boat on choppy water or a car on a bumpy road. It can feel alarming, especially the first time, but it is not dangerous. Here is why:
- Planes are built for it. Aircraft wings are engineered to flex significantly. They can bend much further than anything you will ever experience as a passenger. The plane is not going to break.
- Pilots expect it. Pilots get weather reports showing turbulence areas. They often fly around the worst of it or change altitude to find smoother air. When they cannot avoid it, they slow down to a speed that makes the bumps gentler.
- It feels worse than it is. What feels like a dramatic drop is usually the plane moving 10-20 feet, which is nothing at cruising altitude of 35,000 feet. Your body’s sense of motion amplifies small movements.
What to do during turbulence: Keep your seatbelt fastened (this is the single most important thing). Stay seated. Hold your drink. And know that it will pass, usually within a few minutes. The pilot may turn on the seatbelt sign and ask flight attendants to take their seats. This is standard procedure, not a sign that something is wrong.
Ear Pressure and Popping
As the plane climbs and descends, the air pressure in the cabin changes. This can make your ears feel full, plugged, or mildly painful. It is temporary and harmless, but it can be uncomfortable.
How to fix it:
- Chew gum or suck on hard candy during takeoff and landing
- Swallow frequently
- Yawn widely
- Pinch your nose closed and gently blow (this is called the Valsalva maneuver, and it works instantly)
If you have a cold or sinus congestion, take a decongestant (like Sudafed) about 30 minutes before takeoff. Congestion makes ear pressure significantly worse.
In-Flight Amenities
Food and drinks: Most domestic flights over 2 hours offer a drink service (water, soda, coffee, juice are usually free). Snacks may be free or available for purchase. On longer flights, meals may be included or available to buy. Bring your own snacks regardless, since airline food quality varies widely.
Entertainment: Many airlines offer seatback screens or streaming entertainment through the airline app on your personal device. Download the airline’s app and any content you want to watch before the flight. Do not rely on onboard Wi-Fi for streaming.
Restrooms: Airplane restrooms are small but functional. They are at the front and back of the plane. The door says “Lavatory” and has an Occupied/Vacant indicator. Push the door handle to fold the door inward. Lock it from inside and a light turns on. There is no line etiquette mystery: just stand near the restroom and wait. You do not need to ask permission to use the restroom once the seatbelt sign is off.
Call button: There is a button above your seat (look for the icon of a person or a bell) that calls a flight attendant. Use it if you need something and the crew is not walking through the cabin. It is completely acceptable to use this. That is what it is for.
Things Nobody Tells You About Flying
These are the things experienced flyers take for granted but first-timers often wonder about.
The air is extremely dry. Cabin humidity is around 10-20%, which is lower than most deserts. You will feel thirsty, your skin will feel dry, and your eyes might get irritated. Drink water throughout the flight. A small moisturizer and lip balm help if the flight is longer than 3 hours.
Your feet and ankles may swell. Sitting in a pressurized cabin at altitude causes mild fluid retention. This is normal. Wear loose shoes, stretch your ankles by rotating them periodically, and walk up and down the aisle once an hour on longer flights.
You might feel a bump during landing. The wheels touching down can feel like a firm jolt. Some landings are smooth, others are firm. Both are normal. A firmer landing is sometimes intentional, especially in windy conditions or on wet runways, because it helps the plane grip the runway surface.
The plane makes weird noises. You will hear humming (engines), clunking (landing gear retracting or extending), whirring (flaps adjusting), and dings (communication chimes between crew members). These are all normal mechanical sounds. If you hear a ding followed by the seatbelt sign, it just means the pilot is asking you to stay seated.
It is OK to recline your seat. Most economy seats recline 2-4 inches. You are allowed to use this feature. A courteous approach is to glance behind you first and recline slowly, especially during meal service. On short flights (under 2 hours), many people skip reclining.
You will not feel how fast you are going. A commercial jet cruises at about 550 mph, but once you are at altitude, it feels like you are barely moving. Looking out the window, the ground drifts by slowly because you are so high up. The sensation of speed is only noticeable during takeoff and landing.
Landing and Arrival
The Descent
About 20-30 minutes before landing, the pilot begins descending. You might feel a slight sensation of dropping, and your ears will experience pressure changes again (use the same techniques as during takeoff). The plane will slow down and you will hear the flaps extend (a whirring or humming sound from the wings).
A few minutes before landing, you will hear the landing gear extend with a clunking sound followed by a rumble (the wheels locking into position in the airstream). This is completely normal.
The seatbelt sign will come on. Make sure your seat is upright, tray table is stowed, and your bag is under the seat in front of you.
After Landing
Once the plane touches down and taxis to the gate, the seatbelt sign turns off with a ding. At this point, everyone stands up at once. There is no rush. The doors take a few minutes to open, and the plane empties from front to back.
Grab your carry-on from the overhead bin and your personal item from under the seat. Follow the flow of people off the plane, through the jet bridge, and into the terminal.
If You Checked a Bag
Follow signs to “Baggage Claim.” This is a large area with conveyor belts (carousels) where checked bags are delivered. Screens above each carousel show which flight’s bags are coming out. Find the carousel for your flight number and wait. Bags usually start appearing 10-20 minutes after you reach the claim area.
Find your bag, verify the luggage tag matches your receipt, and head to the exit.
If your bag does not appear: Wait until the carousel stops. If your bag is not there, go to the airline’s baggage service desk (located near baggage claim) with your luggage tag receipt. They will track your bag and arrange delivery, usually within 24 hours. This is uncommon but not a catastrophe when it happens.
International Arrivals
If you are arriving in a different country, you will go through passport control/immigration before baggage claim. Have your passport ready. The immigration officer may ask where you are staying and how long, then stamp your passport. After collecting your bags, you will walk through customs (usually just walking through the green “Nothing to Declare” lane unless you are carrying taxable goods).
Connecting Flights and Layovers
If your trip involves a connecting flight (you land at an intermediate airport and take another flight to your final destination), here is what to expect.
How Connecting Flights Work
When you book a ticket with a connection, your bags are usually checked through to your final destination. You do not need to pick them up and re-check them at the connecting airport (unless you are entering a new country, where customs requires you to collect bags).
At your connecting airport, you will:
- Get off the first plane
- Check the departure board for your next flight’s gate
- Walk (or take an airport shuttle/train) to your next gate
- Board your next flight
You do not need to go through security again at a connecting airport within the US, since you are already in the secure area. For international connections, you may need to go through security or immigration depending on the country.
How Much Connection Time Do You Need?
Domestic connections: 60-90 minutes minimum. This gives you time for the first plane to taxi to the gate, for you to deplane, and to walk to your next gate (which might be in a different terminal).
International connections: 2-3 hours minimum. You may need to clear customs and immigration, collect and re-check bags, and go through security again.
If your first flight is delayed and you are worried about missing your connection, talk to a flight attendant before landing. They can radio ahead to hold the connecting flight or rebook you on the next available flight.
Long Layovers
A layover of 3-8 hours at a connecting airport does not have to be boring. Many airports have restaurants, shops, lounges, and even sleeping pods. Some airports are near enough to a city center that you can leave the airport and explore for a few hours.
Check out Yopki’s layover guides for curated itineraries at major airports. They show you exactly what to do during a layover, including how to get into the city and back, and how much time you need.
Dealing With Flight Anxiety
If you are nervous about flying, that is completely normal. Many experienced travelers felt the same way on their first flight. Here are strategies that actually help.
Understand the statistics. Flying is, by far, the safest mode of transportation. Your odds of being in a fatal plane accident are roughly 1 in 11 million. You are significantly more likely to be struck by lightning. The drive to the airport is statistically more dangerous than the flight itself.
Choose a seat over the wing. This is the most stable part of the plane and where turbulence feels the least intense. The back of the plane experiences more movement.
Bring distractions. Download a few episodes of a show you love, a podcast, music, or a really good book. Having something to focus on makes the flight feel shorter and keeps your mind occupied during turbulence.
Talk to the flight crew. If you tell a flight attendant that it is your first flight, they are usually happy to check in on you and explain any unusual sounds or sensations. They have seen nervous flyers thousands of times and genuinely want to help.
Breathe deliberately. If anxiety spikes, try the 4-7-8 technique: breathe in for 4 seconds, hold for 7 seconds, exhale slowly for 8 seconds. Repeat 3-4 times. This activates your body’s calm-down response.
Skip the caffeine. Coffee and energy drinks increase heart rate and can amplify anxiety. Drink water instead.
A Complete Timeline for Your First Flight Day
Here is what a typical first flight day looks like, using a 10:00 AM domestic departure as an example.
7:30 AM: Leave for the airport (with 30 minutes for driving/transit).
8:00 AM: Arrive at the airport. Find your airline’s terminal. If checking a bag, go to the counter. If not, head straight to security.
8:15 AM: Join the security line with your ID and boarding pass. Prepare to remove shoes, belt, laptop.
8:45 AM: Through security. Follow signs to your gate. Check the departure board for any gate changes.
8:50 AM: Arrive at your gate. Use the restroom. Grab water and a snack. Charge your phone if needed.
9:20 AM: Boarding begins. Listen for your boarding group. Join the line when called.
9:35 AM: Find your seat, stow your bag, buckle up.
9:50 AM: Doors close, safety demonstration, phone to airplane mode.
10:00 AM: Pushback from the gate. Taxi to the runway. Takeoff.
The entire airport process took about 2 hours. For the first hour, you were going through check-in and security. For the second hour, you were relaxing at the gate. No rushing, no stress.
After Your First Flight: Planning Your Trip
Now that you know exactly what to expect when flying, you can focus on the fun part: planning what you will do when you get there.
Yopki’s AI trip planner helps you build a day-by-day itinerary for your destination, whether it is your first trip or your fiftieth. Enter your destination and dates, and it generates a personalized plan you can customize, share with travel companions, and access from your phone during the trip.
For a complete guide on planning the trip itself (not just the flight), check out our how to plan a trip guide.
Quick Reference: First-Time Flyer Cheat Sheet
| What | Details |
|---|---|
| When to check in online | 24 hours before your flight |
| When to arrive at the airport | 2 hours (domestic), 3 hours (international) |
| What to have ready for security | Photo ID + boarding pass |
| Liquids rule | 3.4 oz containers, all in 1 quart-size clear bag |
| Remove at security | Shoes, belt, jacket, laptop, liquids bag |
| Boarding starts | 30-45 minutes before departure |
| Carry-on max size | 22 x 14 x 9 inches (check your airline) |
| Ear pressure fix | Chew gum, swallow, yawn, or pinch-and-blow |
| Minimum domestic connection time | 60-90 minutes |
| Minimum international connection time | 2-3 hours |
Frequently Asked Questions
What should a first-time flyer know?
The most important things to know are: arrive 2 hours early for domestic flights (3 for international), have your ID and boarding pass ready for security, put all liquids in 3.4 oz containers in a clear quart-size bag, and keep your seatbelt fastened during the flight. Beyond logistics, know that turbulence is normal and not dangerous, your ears might pop but it is harmless and fixable, and the flight crew is there to help. If you are nervous, tell a flight attendant. They deal with first-time flyers regularly and are happy to reassure you.
How early should I get to the airport?
Two hours before departure for domestic flights, three hours for international flights. If you are checking a bag, add 15-20 extra minutes. During peak travel times (Thanksgiving, Christmas, spring break, summer Fridays), add another 30 minutes. For your very first flight, lean toward the earlier end. Extra time at the gate beats running through the terminal.
What can I bring on a plane?
In your carry-on, you can bring clothes, electronics, snacks, books, medications, and liquids in containers of 3.4 oz or less (all in one clear quart-size bag). You cannot bring sharp objects, liquids over 3.4 oz, or anything flammable. Important: portable chargers and lithium batteries must go in your carry-on, not your checked bag. In checked bags, you can bring full-size toiletries, tools, and most other items. When in doubt, search for the specific item on tsa.gov.
Is turbulence dangerous?
No. Turbulence is the plane passing through uneven air currents, similar to a car on a bumpy road. Modern planes are built to handle turbulence far beyond what passengers experience. The only risk is to passengers who are not wearing their seatbelts during severe turbulence, which can cause them to be jostled or bumped. Keeping your seatbelt loosely fastened whenever you are seated eliminates this risk entirely. Turbulence cannot cause a plane to crash.