The Complete Travel Document Checklist
Before you digitize anything, you need to know what you’re collecting. Most people remember their passport and boarding pass, then panic at the airport when they can’t find their hotel confirmation or car rental agreement. See our passport application guide.
Here is every document you might need, organized by category. Not all of these apply to every trip, but scanning through the full list before each trip takes two minutes and prevents the “I forgot to print that” moment at the worst possible time.
Identity Documents
- Passport (check expiration: many countries require 6+ months validity past your return date)
- Visa or electronic travel authorization (ESTA, eTA, ETA, etc.)
- Government-issued photo ID (driver’s license or state ID as backup)
- Global Entry / TSA PreCheck / NEXUS card
- Birth certificates for children (some airlines and cruise lines require them)
Transportation
- Flight confirmation and boarding passes
- Train or bus tickets
- Car rental reservation and confirmation number
- International driving permit (if renting abroad)
- Airport transfer or shuttle booking
Accommodation
- Hotel confirmation with address and check-in details
- Vacation rental booking (with door codes, host contact info, check-in instructions)
- Hostel reservation
Financial
- Copies of credit cards (front and back, so you have the number and the bank’s phone number)
- Bank travel notification confirmation (or screenshot showing you’ve notified your bank)
- Travel money card details
- Receipts for any prepaid activities or tours
Medical
- Travel insurance policy with policy number and emergency contact number
- Vaccination records (COVID, yellow fever, or others depending on destination)
- Prescription medications list with generic names (in case you need refills abroad)
- Doctor’s letter for any controlled medications you are carrying
- Allergy information card (especially useful if traveling where you don’t speak the language)
Emergency
- Emergency contact list (family, friends, your doctor)
- Embassy or consulate contact for your destination country
- Local emergency numbers (not every country uses 911)
- Your airline’s customer service number
- Travel insurance emergency assistance number
Activities and Extras
- Tour and excursion confirmations
- Restaurant reservations
- Event tickets (concerts, shows, museum timed entries)
- Loyalty program numbers (airline miles, hotel points)
For a broader look at what to bring on any trip, see our travel essentials checklist.
How to Digitize Your Documents
You have three options for creating digital copies, and they range from “good enough” to “properly organized.”
Option 1: Phone Camera (Quick and Dirty)
Open your phone camera, photograph the document on a flat surface with good lighting. This works in a pinch, but you end up with a camera roll full of random document photos mixed in with your food pics. Not ideal when you’re trying to find your hotel confirmation at midnight.
Option 2: Scanner App (Better)
Use a dedicated scanning app that auto-crops, corrects perspective, and saves as PDF. Good free options:
- Apple Notes scanner (built into iPhone, surprisingly good)
- Google Drive scan (built into the Google Drive app on Android)
- Adobe Scan (free tier works well, auto-detects document edges)
- Microsoft Lens (good for multi-page documents)
Scan both sides of IDs and credit cards. Save everything as PDF for consistency. Name each file clearly (more on naming conventions below).
Option 3: Purpose-Built Travel Tool (Best)
Yopki’s travel document organizer lets you upload documents directly, categorize them by type, and attach them to specific trips. No naming conventions to remember, no folder structures to build. You upload a passport scan, tag it as “Identity,” and it lives with the rest of your trip documents. But more on that in a moment.
Tips for Clean Scans
- Use a dark, solid background (not a patterned tablecloth)
- Make sure the entire document is visible, including edges
- For passports, press the page flat and photograph the data page plus the signature page
- For credit cards, photograph front and back separately
- Check that text is legible before moving on. Zoom in on the scan to verify.
Folder Structure and Naming Conventions
If you’re going the DIY route with Google Drive, iCloud, or Dropbox, a consistent folder structure saves you from digging through 40 files named “IMG_4829.pdf” while standing at the rental car counter.
Recommended Folder Structure
Travel Documents/
  2026 - Italy Trip/
    Identity/
    Flights/
    Hotels/
    Car Rental/
    Insurance/
    Activities/
    Emergency/
File Naming Convention
Keep it simple and sortable:
[Category] - [Description] - [Date if relevant].pdf
Examples:
Flight - LAX to FCO - Jun 15.pdfHotel - Rome Marriott - Jun 15-18.pdfInsurance - World Nomads Policy.pdfIdentity - Passport - John Smith.pdfActivity - Colosseum Tour - Jun 16.pdf
The category prefix means files sort into logical groups even if your folder structure is flat. It also means you can search “Hotel” across all your trips and find what you need.
Storage Options Compared: Cloud vs. Local vs. Travel App
Where you store your digital documents matters. Here is how the main options compare.
Cloud Storage (Google Drive, iCloud, Dropbox)
- Pros: Accessible from any device, easy to share a folder with travel companions, free tiers are generous (15GB on Google Drive)
- Cons: You build and maintain the folder structure yourself, no travel-specific features, requires internet to access (unless you download files for offline use ahead of time)
- Best for: People who already live in a cloud ecosystem and want maximum control
Local Storage (Phone Downloads Folder, USB Drive)
- Pros: Works offline, no account needed, nothing stored on someone else’s server
- Cons: If your phone is lost or stolen, your documents go with it. No backup unless you manually create one. Hard to share with travel companions.
- Best for: Privacy-focused travelers who are diligent about backups
Purpose-Built Travel App
- Pros: Built-in categorization, designed for the travel use case, often includes offline access, can merge documents into a printable packet
- Cons: Another app to install, may have usage limits on free tier
- Best for: Most travelers, especially those who don’t want to build their own system
How Yopki’s Document Organizer Works
This is where things get simpler. Instead of building folder structures and naming conventions from scratch, Yopki’s travel document organizer gives you a system that is already set up for travel documents.
Upload and Categorize
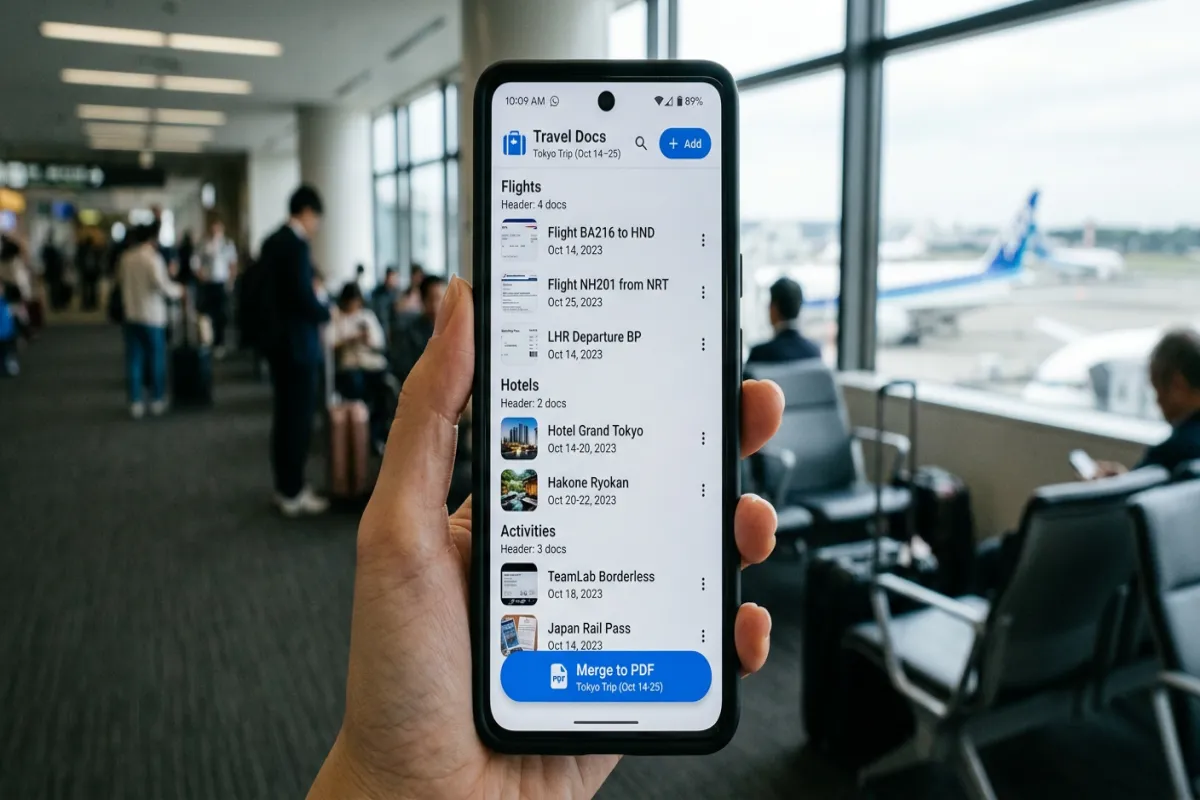
Drop in your passport scan, boarding pass, hotel confirmation, insurance policy, or anything else. Tag each document with a category (Identity, Transportation, Accommodation, Insurance, Medical, Emergency, Activities). Documents are automatically organized within your trip.
Everything Lives With Your Itinerary
Unlike a generic cloud folder, your documents sit alongside your actual trip plan. Looking at your Tuesday itinerary? Your hotel check-in confirmation and restaurant reservation are right there. No switching between apps or hunting through folders.
Merge Into a Printable PDF Packet
Select the documents you want, and Yopki merges them into a single PDF. Print it, toss it in your carry-on, and you have a physical backup of everything critical. This is the feature that saves you when your phone dies at customs.
Share With Travel Companions
Traveling with a partner or group? Share access to the document collection so everyone has the hotel address, the car rental confirmation, and the emergency contacts. No more “can you forward me that email?” texts at 6 AM.
Offline Access
Downloaded documents are available without internet. This matters when you land in a foreign country, have no cell service yet, and need to show your hotel address to a taxi driver.
If you’re planning a full trip (not just organizing documents), our complete trip planning guide walks through the process from start to finish, and the document organizer fits right into that workflow.
Security Practices for Digital Travel Documents
Your travel documents folder contains some of the most sensitive information you own: passport numbers, credit card details, insurance policy numbers. Treat it accordingly.
Do
- Use a strong, unique password for whatever service stores your documents. If your Google account gets compromised and your passport scan is in Drive, that’s a problem.
- Enable two-factor authentication on your cloud storage account. This is non-negotiable.
- Encrypt sensitive files if storing in a generic cloud folder. Most scanner apps can password-protect PDFs.
- Limit sharing to people who actually need the documents. Don’t drop your passport scan into a shared group chat.
- Delete old trip documents after you return. You don’t need your 2023 hotel confirmation sitting in the cloud forever.
Don’t
- Don’t email documents to yourself as your primary storage method. Email is not secure, and you’ll never find them later.
- Don’t store passwords in the same folder as your travel documents.
- Don’t post boarding passes on social media. The barcode contains your booking reference, which can be used to access and modify your reservation.
- Don’t rely on screenshots. They are hard to read, can’t be searched, and take up more space than a clean PDF.
The Printable Backup Packet
Digital is primary, but paper is your safety net. Build a physical backup packet with these documents, printed and stored in your carry-on (separate from your actual passport and wallet):
- Passport data page (color copy if possible)
- Visa or travel authorization
- Flight itinerary with confirmation numbers
- Hotel confirmations with addresses and phone numbers
- Travel insurance policy with emergency claim number
- Emergency contacts (family, embassy, insurance hotline)
- Credit card information (just the issuer and phone number for reporting lost cards, not the full number)
With Yopki’s document organizer, you select the documents you want in your backup packet, hit merge, and get a single PDF ready to print. Takes about 30 seconds once your documents are uploaded.
If you want to save your full itinerary as a printable document too, see our guide on how to save your itinerary as a PDF.
Setting Up Your System: A Step-by-Step Walkthrough
Here is the practical sequence to get all your documents organized before your next trip. Budget about 30-45 minutes the first time. After that, it takes 10 minutes per trip because you already have templates and recurring documents (like your passport) saved.
- Gather physical documents. Pull out your passport, insurance card, any printed confirmations. Open your email and search for booking confirmations.
- Scan everything. Use a scanner app or upload directly to Yopki’s document organizer. Two minutes per document.
- Categorize. Sort into the categories listed above (Identity, Transportation, Accommodation, etc.).
- Verify. Open each scan and make sure text is readable, especially confirmation numbers and addresses.
- Create your backup packet. Select critical documents and merge into a printable PDF.
- Share access. Give your travel companion access to the collection. Send a copy of the backup packet to a trusted contact at home.
- Download for offline. Make sure key documents are available on your phone without internet.
That is it. Once your system is in place, adding documents for future trips is just a matter of uploading new confirmations as they come in.
Frequently Asked Questions
How do I organize my travel documents?
Start by listing every document you need: passport, visa, boarding passes, hotel confirmations, travel insurance, vaccination records, car rental agreement, and emergency contacts. Scan or photograph each one and organize them into folders by category or trip. Store them in a cloud service for access from any device. For a purpose-built solution, Yopki’s travel document organizer lets you upload, categorize, and merge everything into one printable PDF packet.
What travel documents do I need?
For domestic travel: government-issued ID, boarding passes, hotel/rental confirmations, car rental agreement, travel insurance policy, and any activity reservation confirmations. For international travel, add: passport (valid 6+ months past return date), visa if required, vaccination records (some countries still check), travel insurance with international coverage, copies of your credit cards (front and back), and embassy contact information for your destination country.
Is there an app to store travel documents?
Yes. Yopki’s travel document organizer is built specifically for this. You upload passports, confirmations, insurance, and any other trip documents, organize them by category, and can merge everything into a single printable PDF. TripIt can parse forwarded confirmation emails. Google Drive or iCloud work for basic storage but require you to create your own folder structure. For most travelers, a purpose-built travel app is easier than managing folders in a generic cloud service.
Should I have digital copies of travel documents?
Absolutely. Digital copies are essential for three reasons. First, if your physical documents are lost or stolen, digital copies make replacement dramatically faster, since embassies and airlines can work with scanned copies. Second, many hotels, car rental agencies, and tour operators accept digital confirmations shown on your phone. Third, having everything accessible on your phone means you never have to dig through a bag at the airport. Always keep both digital and physical copies of critical documents like passports and visas.