You have a destination, a set of dates, and a growing list of things you want to do. Now you need to figure out when all of it actually happens. That is the job of a trip planning calendar – and it is the single biggest difference between a trip that flows and one that falls apart by Day 2.
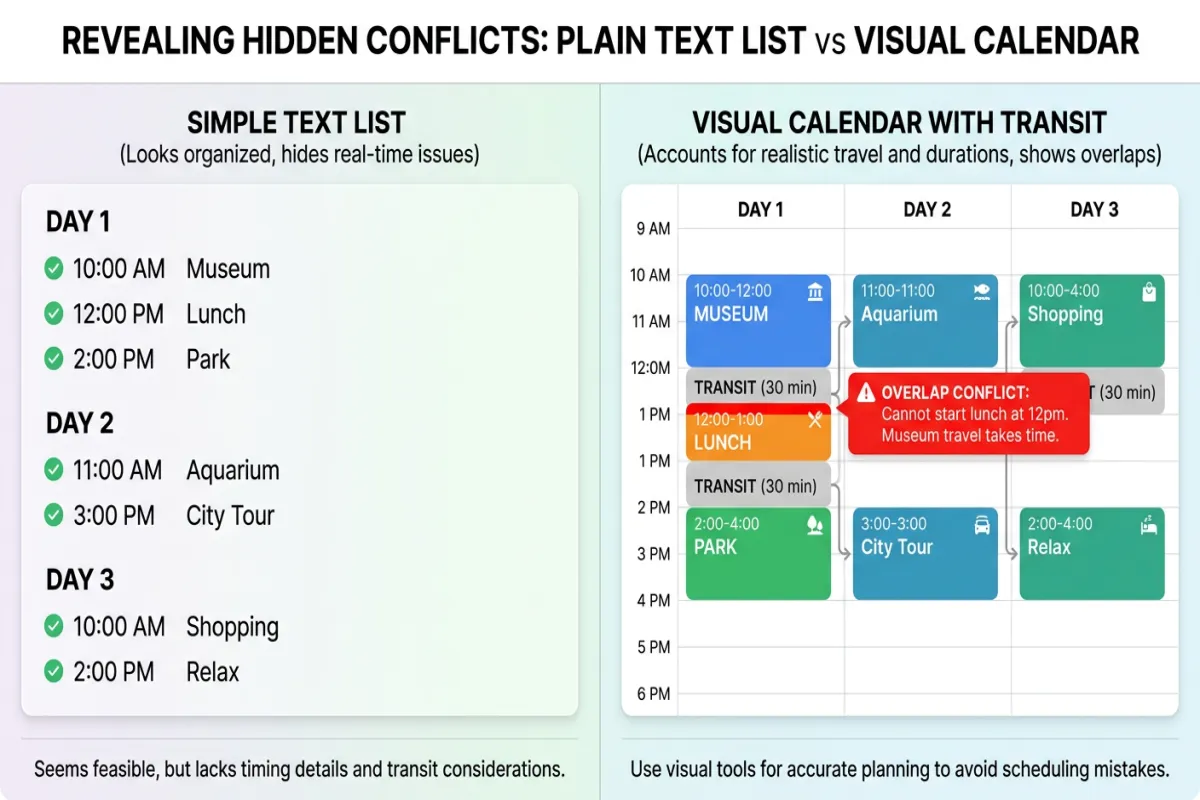
Most people plan trips with lists. A list of restaurants, a list of landmarks, a list of “must-dos” pulled from blog posts and TikTok saves. Lists are great for collecting ideas. They are terrible at answering the question that actually matters: does this all fit?
A calendar forces you to answer that question. When you place activities into real time slots on real days, you immediately see conflicts, gaps, and days that are packed way too tight. That visual clarity is why calendar-based planning works better than every other method – and why it is worth learning how to do it well.
This guide covers the practical how-to: building a trip calendar from scratch, choosing the right tool for your planning style, and avoiding the scheduling mistakes that ruin good trips.
Why Calendar-Based Planning Beats Lists Every Time
A trip itinerary list tells you what you want to do. A trip planning calendar tells you whether you can actually do it. That gap is where most trip stress comes from.
Here is what a calendar-based approach gives you that lists do not:
You See Time Conflicts Immediately
Your list says “Colosseum” and “Vatican Museums” on the same day. Seems reasonable – they are both in Rome. But when you put them on a calendar with realistic time blocks, you realize the Colosseum takes 2-3 hours, the Vatican takes 3-4 hours, you need lunch somewhere in between, and travel time across the city is 30-45 minutes each way. Suddenly your “easy day” is a 10-hour marathon with no breathing room.
A calendar shows this conflict before you are standing in a ticket line at 4 PM wondering why you are so tired.
You Can Schedule Around Energy, Not Just Time
Day 1 after a transatlantic flight is not the day for a 15-mile walking tour. The day after a full day at a theme park is not ideal for a sunrise hike. When you see your entire trip laid out on a calendar, you can alternate heavy days with lighter ones. You can put the physically demanding activities on days when you will be rested, and schedule low-key neighborhood walks or cooking classes for recovery days.
You Build in Transition Time Automatically
Lists do not have gaps. Calendars do. When you place a museum visit from 10 AM to 12:30 PM and a lunch reservation at 1 PM, you can see at a glance whether 30 minutes is enough to get from one to the other. If the restaurant is across town, you know to either move lunch to 1:30 or pick a restaurant closer to the museum.
This kind of practical sequencing is impossible with a flat list.
You Spot Over-Scheduling Before It Ruins Your Trip
The number one mistake in trip planning is cramming too much into each day. It is easy to do with a list – just keep adding items. But a calendar has a fixed amount of space per day. When every slot is filled from 7 AM to 11 PM, the visual message is clear: this is too much.
We will dig deeper into the over-scheduling problem later, because it deserves its own section.
How to Build a Trip Planning Calendar (Step by Step)
Whether you use a paper planner, a digital calendar, or a dedicated trip planning app, the process follows the same six steps.
Step 1: Start With Your Anchors
Open your calendar and mark the start and end dates of your trip. Then add every event that has a fixed time:
- Flight departures and arrivals
- Hotel check-in and check-out times
- Restaurant reservations
- Timed-entry tickets (many major museums and attractions require these now)
- Tours, cooking classes, or activities with set start times
- Any event or show with a specific schedule
These anchors are non-negotiable. Everything else works around them.
Step 2: Divide Days Into Time Blocks
Split each day into three blocks:
- Morning block: 8 AM – 12 PM
- Afternoon block: 12 PM – 5 PM
- Evening block: 5 PM – 10 PM
Three blocks, three potential activity windows. For most travelers, 2-3 significant activities per day is the realistic ceiling before fatigue takes over. (For trips with kids, budget for even fewer – maybe 1-2 main activities, with extra buffer for snack breaks and meltdowns.)
Step 3: Place Activities With Honest Time Estimates
This is where most people underestimate. A “quick stop” at a famous landmark is rarely less than an hour once you factor in lines, photos, and the walk to and from. Here are realistic time estimates for common activities:
- Major museum: 2-4 hours
- Landmark or viewpoint: 45-90 minutes
- Neighborhood walk / food tour: 2-3 hours
- Sit-down restaurant meal: 60-90 minutes
- Beach or park time: 2-4 hours
- Shopping district: 1-3 hours
- Day trip to a nearby town: 6-10 hours including transit
Add 30-60 minutes of buffer between activities for travel time, bathroom breaks, and the inevitable “wait, let me just check this one more thing.”
Step 4: Check the Map
This step is critical and most people skip it. Look at where your activities fall geographically. If your 10 AM activity is in Montmartre and your 1 PM activity is in the Latin Quarter, you are spending 30-45 minutes on the Metro in between – time that disappears from your calendar.
The fix: group activities by neighborhood. Spend your morning in one area, your afternoon in an adjacent area, and your evening wherever dinner takes you. This is where a visual trip planner that shows both a calendar and a map view becomes invaluable – you can see time and space simultaneously.
Step 5: Leave Gaps on Purpose
Block out at least one time slot per day as intentionally empty. Label it “free time” or “buffer” or just leave it blank. This is not wasted time. It is where the best parts of travel happen: the side street you wander down, the local who tells you about a hidden courtyard, the gelato shop with no line.
It is also your insurance policy. When something takes longer than expected (and something always does), your buffer absorbs the delay instead of cascading it into every activity for the rest of the day.
Step 6: Zoom Out and Review the Full Trip
Once individual days are filled in, switch to a full-trip view. Look for patterns:
- Are any days stacked with 5+ activities while others have nothing?
- Is there a rest day (or at least a lighter day) after a physically demanding one?
- Does your arrival day have plans that ignore jet lag and late check-in?
- Is your last day realistic given packing, checkout, and airport transit?
Redistribute until the rhythm feels sustainable. A great trip calendar should look like a breathing pattern – activity, rest, activity, rest – not a sprint.
The Best Tools for Trip Calendar Planning
You have options, and the right choice depends on how you think. Here is an honest breakdown.
Google Calendar (Free)
The simplest starting point if you already use Google Calendar for work and life. Create a new calendar named “Trip – [Destination]” and start adding timed events.
What it does well: Familiar interface, easy to share with travel partners, color-coding by category (food, sightseeing, transport), and reminders before each event. You can add location to each event so it links to Google Maps.
What it lacks: No map view, no travel-time calculation between stops, no way to see your full itinerary on a map. You end up switching between Google Calendar and Google Maps constantly, which makes it hard to do Step 4 (checking geographic routing) efficiently.
Best for: Quick weekend trips where routing is simple and you do not need to coordinate a complex multi-day itinerary.
Want a ready-made structure? Try our travel schedule template to get started quickly.
Spreadsheets: Google Sheets or Excel (Free)
A spreadsheet gives you a custom vacation calendar planner where columns represent days and rows represent time slots. You can add cost columns, address columns, booking reference numbers – whatever you need.
What it does well: Total flexibility, easy to share, great for budget tracking alongside scheduling.
What it lacks: No map integration, no drag-and-drop rescheduling, and it gets unwieldy for trips longer than 4-5 days. Reorganizing a day means cutting and pasting cells, which is tedious.
Best for: Planners who want full control over formatting and love the structure of a grid. Works well as a trip planning template you customize for each trip.
Canva Calendar Templates (Free and Paid)
Canva shows up a lot in search results for trip calendars, and for good reason – their templates are visually appealing and easy to customize. You pick a calendar layout, add your activities, and end up with something you can print or save as a PDF.
What it does well: Beautiful output, great for printing and putting on a fridge or in a travel binder. Works well as a visual overview you can hand to family members.
What it lacks: It is a design tool, not a planning tool. No time calculation, no map, no ability to automatically adjust downstream activities when you move one. If you change your afternoon plans, you have to manually update everything that follows.
Best for: Creating a finalized visual summary of a trip that has already been planned in another tool.
Yopki: Calendar + Map in One View (Free Plan Available)
This is the approach we built Yopki around. Instead of switching between a calendar app and a map app, you see both at the same time. Your itinerary shows up as time blocks on a day-by-day calendar on one side of the screen, and every activity appears as a pin on an interactive map on the other side.
What it does well:
- Drag-and-drop scheduling. Move an activity from Tuesday afternoon to Wednesday morning by dragging it. Everything else adjusts.
- Simultaneous calendar + map. When you add a 10 AM museum visit and a 1 PM restaurant, you can see on the map whether they are close together or across town. The routing between stops is visible, so you catch geographic inefficiencies in real time.
- AI-generated starting points. Use “Fill with AI” to generate a full day-by-day calendar based on your destination, dates, and interests. Then edit it – move things around, swap activities, add your own finds. It is a starting point, not a final product.
- Shareable itineraries. Send your calendar to travel partners so everyone is on the same page. Changes sync automatically.
What it lacks: It is specifically a trip planner, so it does not replace your regular daily calendar. You would still use Google Calendar or Outlook for non-travel life.
Best for: Multi-day trips, group travel, city trips where routing matters, and anyone who has ever stared at a list of 20 activities and thought “how do I fit all of this into four days?”
Google My Maps (Free)
A solid free option if your main concern is geographic planning. Pin your activities on a map, organize them into layers by day, and see the spatial layout of your trip.
What it does well: Map-first view, color-coded layers, shareable links. Great for visualizing a road trip route or seeing how a city splits into neighborhood zones.
What it lacks: No calendar or time-slot view. It shows you where but not when. You still need a separate calendar to handle scheduling. Read our full guide on using Google Maps for itinerary planning for the best workflow.
Best for: Road trips and exploratory travel where the route matters more than a tight hour-by-hour schedule.
The Over-Scheduling Problem (and How a Calendar Fixes It)
For a deeper dive into map-based planning, our guide on how to plan a trip on Google Maps walks through the full process step by step.
Let’s talk about the most common way trips go wrong: trying to do too much.
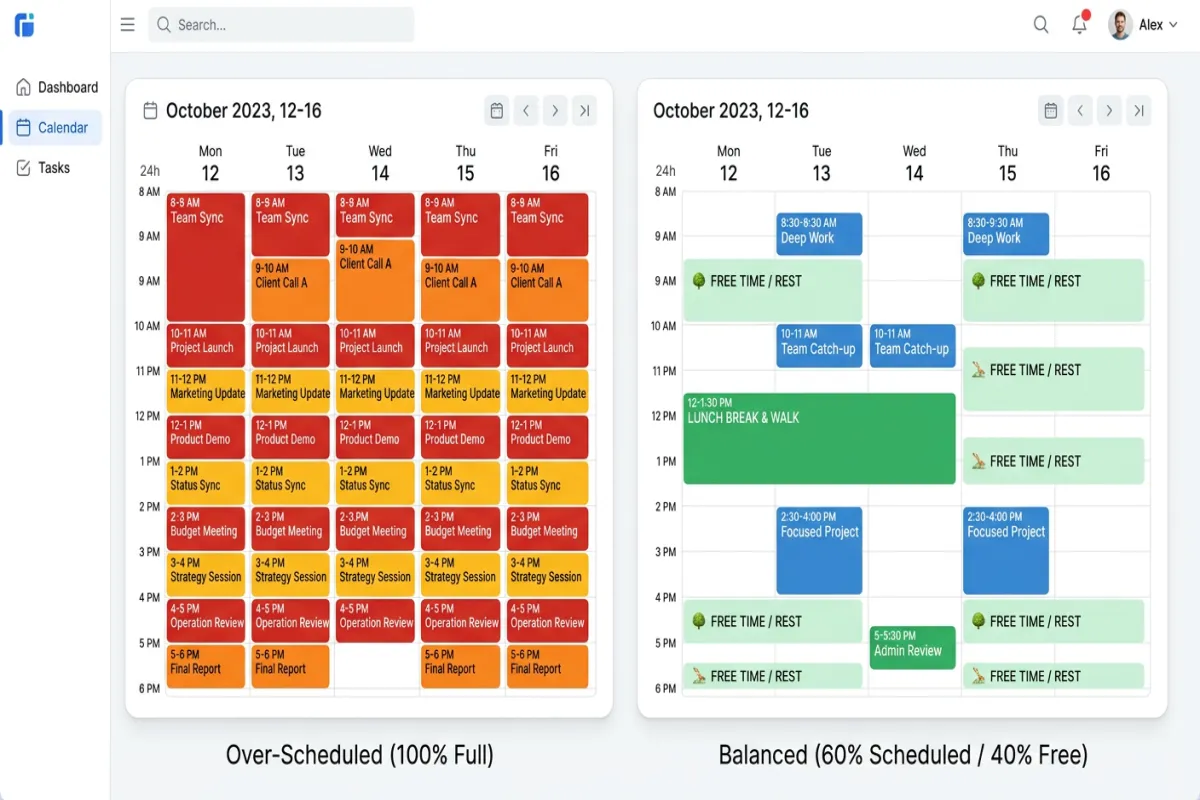
It is incredibly easy to over-schedule a trip. You have limited days in an amazing destination, and you do not want to miss anything. So you add one more museum, one more restaurant, one more “quick detour.” Before you know it, your Tuesday in Barcelona starts at 7 AM with sunrise at Park Guell and ends at midnight after a flamenco show, with zero downtime in between.
On paper (or in a list), this looks ambitious and exciting. On a calendar, it looks like what it actually is: exhausting.
The Calendar Reality Check
When every time slot from 8 AM to 10 PM is filled, a calendar gives you a visceral, visual signal that something is wrong. You can see the wall of color. You can count the activities: seven. You can add up the hours and realize there is no time for lunch, no time for transit, and no time to simply exist in the place you traveled thousands of miles to visit.
This visual feedback is something lists cannot provide. A list of seven activities looks the same length whether they take 4 hours total or 14.
The Fix: The 60% Rule
A practical guideline: only schedule about 60% of your available time. If you have a 12-hour waking day (8 AM to 8 PM), that means about 7 hours of planned activities. The remaining 5 hours absorb travel time, meals, rest, and spontaneous exploration.
On a calendar, the 60% rule means each day should have visible white space. If there is no gap between your 10 AM block and your 3 PM block, you are over 60%.
This does not mean you will waste time. It means the time you do not plan will be filled by the trip itself – which is the whole point of traveling.
Practical Tips for Time-Blocking Your Trip
Once you have the basics down, these tips help you build a trip calendar that actually holds up in the real world.
Account for “Getting There” Time
Every activity has invisible time around it: walking to the subway, waiting for a bus, finding the entrance, standing in a security line. Add 20-30 minutes before and after each activity for this friction. In large cities like London, Tokyo, or New York, add even more – getting across town can easily eat 45 minutes.
Front-Load Reservations, Back-Load Flexibility
Put your timed-entry tickets and reservations in the morning when your energy is high and your schedule is fresh. Leave afternoons more open so you can adjust based on how the day unfolds. If the morning museum took longer than expected (because it was amazing), you have afternoon flexibility to absorb it.
Color-Code by Category
Use colors to distinguish activity types at a glance: blue for sightseeing, green for food, orange for transport, purple for rest or free time. When you look at a day that is entirely blue, you know it is all sightseeing and no variety. A good day has mixed colors.
Mark “Movable” vs. “Fixed” Activities
Some activities have fixed times (flights, timed tickets, dinner reservations). Others are flexible (visiting a park, walking through a market, grabbing coffee at a cafe). Mark the fixed ones differently – bold text, a star icon, or a specific color – so you know at a glance which blocks can shift if you need to rearrange.
Plan Your First and Last Days Differently
Arrival day is not a full day. After a flight, airport transit, hotel check-in, and getting oriented, you probably have one activity window – usually the evening. Do not plan a packed arrival day.
Last day is the same in reverse. Factor in checkout, luggage storage or transit to the airport, and a time buffer for unexpected delays. Your last day activity window is usually just the morning.
Calendar + Map: Why Both Views Matter
A trip planning calendar answers the when question. A map answers the where question. The best planning happens when you can see both simultaneously.
Consider this scenario: you are planning a day in Paris. Your calendar says Louvre at 10 AM, lunch at 12:30 PM, Eiffel Tower at 2:30 PM, Sacre-Coeur at 5 PM. The timing looks fine. But on a map, you would see that the Eiffel Tower and Sacre-Coeur are on opposite sides of the city, and the 2:30 PM to 5 PM gap is mostly spent on the Metro.
A travel calendar planner that shows both views lets you catch this and fix it: swap the Eiffel Tower to the morning (it is closer to the Louvre) and move Sacre-Coeur to a different day when you are already in northern Paris.
This is the core idea behind visual trip planning. It is not about making pretty graphics – it is about making decisions with complete spatial and temporal information. When your AI travel planner generates an itinerary, the calendar + map view lets you instantly validate whether the AI’s suggestions make geographic sense.
Frequently Asked Questions
What is the best app to plan a trip itinerary?
Yopki is one of the best apps for planning a trip itinerary because it combines a drag-and-drop calendar with an interactive map in one view. You can see exactly how your day flows both in time and on a map. Google Maps is useful for route research, and Wanderlog or TripIt work well for travelers who want a simpler list-based approach. For AI-generated starting points, Yopki’s “Fill with AI” feature builds a full day-by-day calendar you can edit.
How do I create a trip calendar?
Start by listing your travel dates and fixed commitments (flights, hotel check-in, reservations). Then block out morning, afternoon, and evening slots for each day. Add activities into those slots, leaving 30-60 minutes of buffer between entries for travel time and rest. You can do this in Google Calendar, a spreadsheet, or a dedicated trip planner like Yopki that handles time blocking and map routing automatically.
Is there a free trip planner tool?
Yes. Google Calendar is completely free and works well for basic trip scheduling. Google My Maps lets you pin locations on a map for free. Yopki offers a free plan that includes calendar-based itinerary building with map integration, drag-and-drop scheduling, and AI-generated itineraries. Canva has free calendar templates if you prefer a printable visual layout.
How to use Google Calendar for travel planning?
Create a dedicated calendar called “Trip – [Destination]” so you can toggle it on or off. Add your flights and hotel as all-day events. Then create timed events for each activity, using the location field so Google Maps links are embedded. Color-code by category (food, sightseeing, transport). Set reminders 30 minutes before each event. The main limitation is that Google Calendar does not show a map view or calculate travel time between stops – for that, you would need a dedicated trip planning tool.
Start Building Your Trip Calendar
The shift from list-based planning to calendar-based planning is one of those small changes that makes a disproportionate difference. You do not need special software to start – a Google Calendar or a simple grid on paper works. The key is putting activities into time slots so you can see whether your plan is realistic before you are on the ground trying to execute it.
If you want the calendar + map combination that makes visual planning fastest, try Yopki for free. Drop in your destination and dates, let AI generate a starting calendar, then drag and rearrange until it feels right. You will see your entire trip – when things happen and where they are – in a single view.
Because the best trip is not the one with the most activities. It is the one where every activity actually fits.